
 Experience Microsoft Product Ads for
  free until January 1, 2026 - absolutely no cost!


If you are new to the whole Performance Max topic we got you covered. You can check our article to learn more about this brand-new Google Ads campaign type. We have been working hard to implement P. Max ads in BlueWinston so let’s talk more about what have we done so far.
Through the BlueWinston PPC tool, you can create Google Performance Max campaigns really fast and with a few added bonuses. In this article, we bring you the full process of the creation, an explanation of the main functions of P. Max campaigns, and of course, what we plan to do next with them.
The process of creation of the Performance Max campaigns in BlueWinston so far:
1. Link your Google Merchant account with BlueWinston

2. In the list of campaigns, click Create new and choose Performance MAX ads

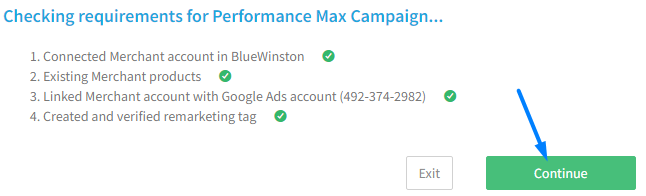
3. The BlueWinston will do an automatic check if all conditions are met for the campaign creation
4. General settings
Select the Merchant center account from which you want to filter the products, the country of the advertisement, and the campaign name.

5. Budget and Bidding
Input your daily budget (we advise at least 10€ per every 500 products). The bidding strategy is automatically selected and so is the Smart Bidding option. It will be automatically activated as soon as you reach 50 conversions in 30 days. For best results, we advise you to input Margin or ROAS right at the start of the campaign creation.

6. Product filtering
Product filtering is one of our main features so the setup is a bit broader. You can always choose one or use multiple filters depending on how much you want to specify the products in the campaign. If you want to use all products in the campaign you don’t have to select any filters and you can skip this option by clicking the Save & continue button.
We can separate the filters into three categories:
- Tag filters – filtering by using the tags from your Merchant Center product feed
- Price and Value filters – filtering by using Price or Margin value
- Words in product titles – filtering by words that have to be or can’t be in the product name
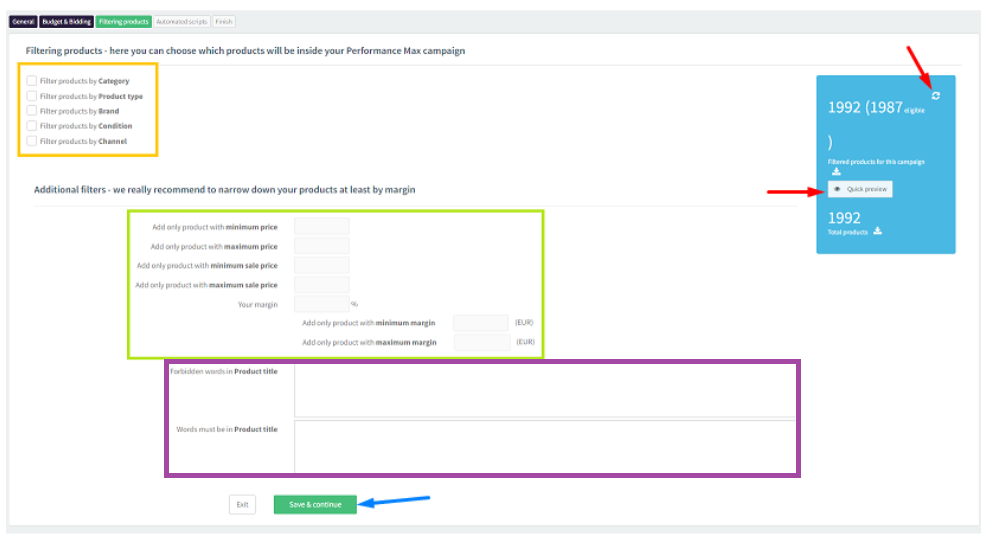
When you select desired filters you can click the Refresh button in the Preview window located in the upper right corner and check how many products will you have in the campaign. At the same time, you can also click the Quick preview button and see what those filtered products are (the preview will show the first 200 products from the feed).
7. Automated scripts
In this step, you can ease your optimization process by selecting scripts that can do a few things instead of you. If you want to optimize the campaign manually and without the scripts, you can skip this option by clicking on the Save & continue button.
We can separate the setup into three sections:
- CPA calculations – you can set fixed CPA, dynamically calculate it or use a tag from your product feed. We by default use Dynamically calculated CPA. You can check what are the CPA values for each product in the Preview by clicking the Refresh button.
- Automatic budget increase – if selected the BlueWinston will automatically increase the budget in your campaign by the value you input if the ROAS is being achieved and there is room for improvement.
- Excluding products – if selected the BlueWinston will automatically pause products when they meet the parameters set up in the script.

This is the final step in the campaign creation process for now. Assets and other settings can be edited directly in the Google Ads after the campaign is updated.
